Application Note
for Au® PIC Bootloader
By Au Group Electronics
March 2008

WHAT’S NEEDED BEFORE INSTALL AU PIC BOOTLOADER?
-
A PC equipped with serial port or PC equipped with USB port + “USB to Serial Converter".
-
Serial cable to connect a PC to a PIC target board.
-
Au® PIC Bootloader installation program (it is available through Au Group Electronics)
-
An encrypted PIC-code file with extension of "Aud" (it will be provided by Au Group Electronics for different products, e.g. SAE-J1939 simulator, etc.)
HOW TO INSTALL AND USE THE Au PIC BOOTLOADER?
Note: If you have the Au® PIC Bootloader installed on your PC before, please bypass step 1 to step 8, and start with step 9.
1. Double click icon of the “Setup Au PIC Bootloader V1.00A” to start installing Au® PIC Bootloader, as shown in figure 1

Figure 1 - Setup Au PIC Bootloader V1.00A icon
2. “Welcome to the Au PIC Bootloader Setup Wizard” window show up, click “Next” (figure 2)

Figure 2 – Au PIC Bootloader setup wizard startup
3. “License Agreement” window show up, read the license agreement and select “I accept the agreement”, then click “Next” to continue (figure 3).
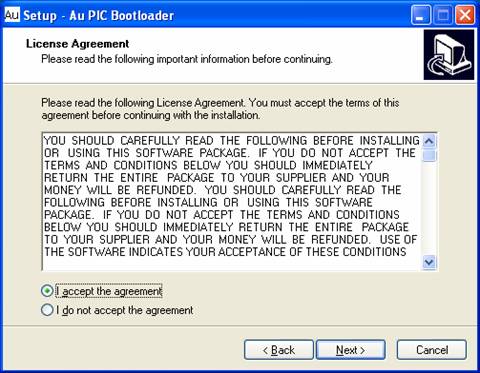
Figure 3 – License Agreement window for Au PIC Bootloader
4. “Select Destination” window shows up, use default path: C:\Program Files\ AU PIC Bootloader”, then click “next” to continue (figure 4).

Figure 4 – Select Destination Location window for install Au PIC Bootloader
5. “Select Start Menu Folder” window show up, use default setting “AU PIC Bootloader”, then click “next” (figure 5).
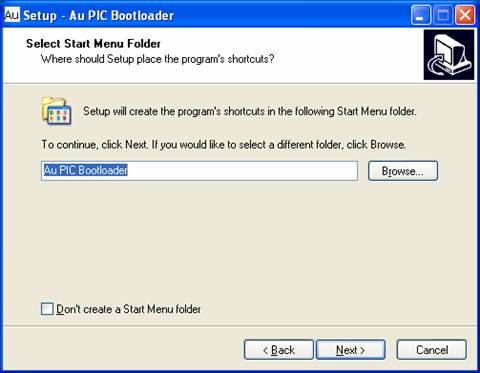
Figure 5 – Select Start Menu Folder window for install Au PIC Bootloader
6. “Select Additional Task” window shows up, check both “create a desktop icon” and “Create a quick launch icon”, and then click “next” to continue (figure 6).

Figure 6 – Select Additional Tasks window for install Au PIC Bootloader
7. “Ready to Install” window shows up. Click “Install” (figure 7).
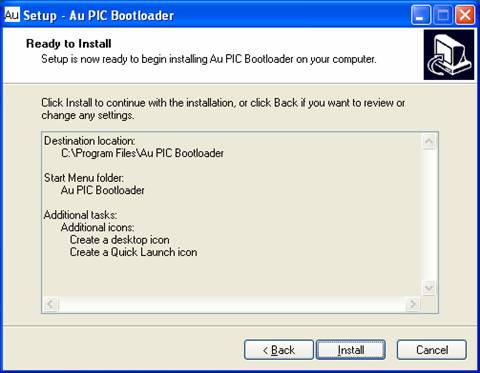
Figure 7 – Ready to install window for install Au PIC Bootloader
8. After a few seconds, “Completing the Au PIC Bootloader Setup Wizard” window shows up, leave the “launch Au Bootloader” checked, click “Finish” to exit setup (figure 8).

Figure 8 – Completing Au PIC Bootloader Setup Wizard window for install Au PIC Bootloader
9. Au® PIC Bootloader program launched, four steps are shown in the Bootloader GUI.
Step 1. Load Program File: Use a serial-cable to connect PC with target board, then click “Load File” button (figure 9). Select file type with “.Aud” extension, then click “Open” (figure 10).
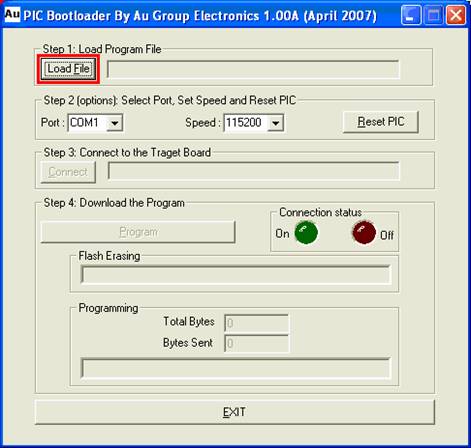
Figure 9 – Au PIC Bootloader launched

Figure 10 – a file with *.Aud extension to be loaded into Au PIC Bootloader
Step 2: Select communication port, set communication speed, and trigger target board into Bootloader mode
-
Select the communication port on your PC, which has been connected with the target board through the serial cable. Without a correct Port selection, the connection between PC and the target board won’t be build.
Trigger target board into Bootloader mode by one of the following 2 ways:
For most of Au Group products, Bootloader mode on the target board can be triggered either from Bootloader software or from target board itself. This demonstration is shown in an example of an Au® SAE-J1939 simulator product.
From target board: Press and hold MENU button on an Au® SAE-J1939 simulator, then plug in +9~+12V DC power supply to power on, the "WARNING" LED will blink indicating it has entered the Bootloader mode.
From software (Au PIC Bootloader User Interface): If the PIC target board has already been powered on, Bootloader mode can be triggered by click “Reset PIC” button (figure 11).
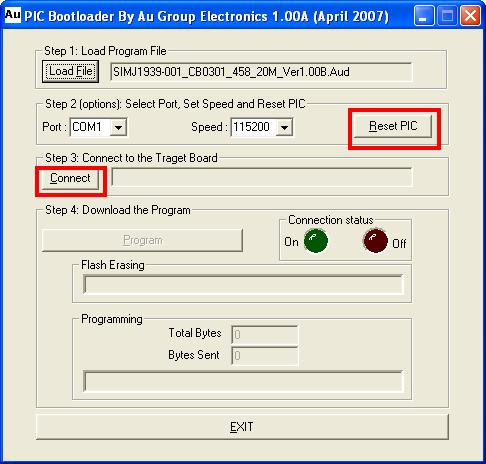
Figure 11 – Click “Reset PIC” button to trigger target board into Bootloader mode
Note: Most of the products from Au Group Electronics has a 10 seconds time-out-period to let the Bootloader program connect to the board, if the user fail to connect the board in this time period, please repeat this step.
Step 3: Connect to target board: Within 10 seconds, click “Connect” button, the "WARNING" LED on Au® J1939 Simulator will be constant on, also the connection status indicator – the Green light on Bootloader GUI will be on, notice that “Program” button now been activated, Also the target board PIC Bootloader information "Au-CB0301, F458, 20M, BTL232-E-001 1.00A" will show up, as shown in figure 12.
Note: Different product might show different messages here.
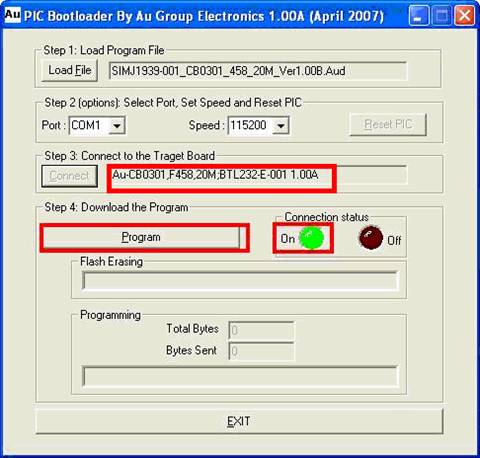
Figure 12 – Click on “Connect” button, connection green light turn on, “Program” button is activated
Step 4: Download program to target board: Click “Program” button, the flash of the target board will be erased first, it takes a few seconds. Then the pre-loaded "xxxx.Aud" file will be programmed into the target board, and the programming status will show up, as shown in figure 13. This process may take a few minutes depending on the file size and the communication speed.

Figure 13 – Au PIC Bootloader showing the programming status
10. Exit Bootloader upon finish:
When programming finished, click “exit” to exit Bootloader mode. The target board should function normally with the new code now.


