
Last Updated on: March/20/2018 |
for 1024x768 & higher screen resolution |
Telephone:+1(774)929-7084 |
| >Downloads>Au dsPIC30F CAN Bootloader User Manual |
Au Group Electronics dsPIC30F CAN Bootloader User Manual
|
Editions of dsPIC30F CAN Bootloader |
Flash |
EEPROM |
RAM |
Compact Edition (no encryption) |
0x0000-0x0AFE |
One Word: 0x7FFFFE |
<150 bytes |
Compact Plus Edition (with encryption) |
0x0000-0x0AFE |
One Word: 0x7FFFFE |
<150 bytes |
Standard Edition (No encryption) |
0x0000-0x0DFE |
One Word: 0x7FFFFE |
<150 bytes |
Standard Plus Edition (with encryption) |
0x0000-0x0DFE |
One Word: 0x7FFFFE |
<150 bytes |
Premium Edition (no encryption) |
0x0000-0x0FFE |
One Word: 0x7FFFFE |
<150 bytes |
Premium Plus Edition (with encryption) |
0x0000-0x0FFE |
One Word: 0x7FFFFE |
<150 bytes |
Note:
1. Above data is for reference only, it might be slightly different for different chips.
2. The last word of EEPROM is reserved for bootloader, e.g. for dsPIC30F6012A, it's EEPROM address: 0x7FFFFE.
Major features
-
Code-safety: the Au Group Electronics developed dsPIC30F CAN bootloader implemented Interrupt Vector Table (IVT) and Alternate Interrupt Vector Table (AIVT) remapping technology, which requires no erasing of IVT and AIVT section on any dsPIC30F chipset. This feature will also protect the "Reset-GOTO" instruction from being erased, which will guarantee the bootloader be always "alive" no matter what happened. The whole Bootloader section is also software protected, which prevents it from being erased by itself. Hardware protection on bootloader section is available on all premium editions.
-
Easy use: with the smart IVT and AIVT auto-remapping technology in standard edition and premium edition, the remapping process of IVT and AIVT is transparent for bootloader user. Both merged hex file (which has remapped IVT/AIVT information) and raw-application hex file (which doesn't have remapped IVT/AIVT information) can be used directly for standard edition(s) and premium edition(s). For code size reason, the compact edition doesn’t implement this auto-remapping technology, so it does require manually remapping the IVT/AIVT for each application.
-
Compact edition(s) are available for resource-limited application: Manually remap IVT and AIVT in hex file is required for compact edition(s).
-
Various CAN communication speed available: 500k bps and 250k bps baud rate are available, and other CAN communication speed can be developed per request.
-
Multiple bootloader entering methods available: Hardware trigger method is always available to force chip enter bootloader mode, optional software trigger method (which makes end user bootloading operation a lot easier) is also available.
-
Custom hex file merge service and IVT/AIVT remapping service are available
-
Plus editions (with encryption) are available for IP protection purpose
The above features are summarized in table 2.
Table 2 Major Feature list of dsPIC30F CAN bootloader editions
Editions of dsPIC30F CAN Bootloader |
"Reset-GOTO" protection |
IVT/AIVT Remapped |
Optional software bootload entering |
Software bootloader section protection |
Encryption |
Hardware bootloader section protection |
Smart IVT/AIVT auto-remapping Technology |
Compact Edition |
√ |
√ |
√ |
√ |
|
|
|
Compact Plus Edition |
√ |
√ |
√ |
√ |
√ |
|
|
Standard Edition |
√ |
√ |
√ |
√ |
|
|
√ |
Standard Plus Edition |
√ |
√ |
√ |
√ |
√ |
|
√ |
Premium Edition |
√ |
√ |
√ |
√ |
|
√ |
√ |
Premium Plus Edition |
√ |
√ |
√ |
√ |
√ |
√ |
√ |
Recommended CAN Network and CAN Transceiver Interface
CAN Network
Rule of thumb to make a reliable CAN bootloading process is: Do not mix different speed CAN nodes in the same network. All CAN nodes in the same network must all run the same speed, for instance 500K bps.
Figure 1 illustrates a typical vehicle CAN network, two 120 ohm terminal resistors must located at each end of the network backbone. An Au Group Electronics BLC-CAN device is used to translate hex data from PC to CAN network. The dsPIC30F microcontroller (MCU) on ECU 2 can be upgrade in field with Au Group Electronics developed dsPIC30F CAN bootloader technology.
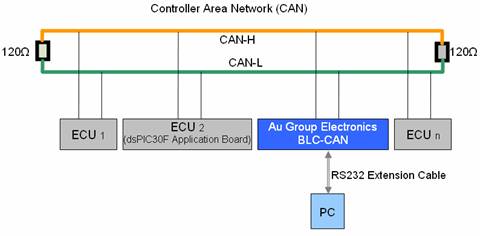
Figure 1
Figure 2 illustrate a minimum CAN network with two CAN nodes, which can be used to upgrade dsPIC30F MCU in a lab test environment.
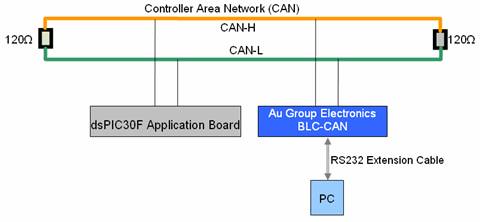
Figure 2
CAN Transceiver
There are many CAN transceivers on the market, to make a smooth integration of Au Group Electronics developed dsPIC30F bootloader technology, hardware designer should secure that the CAN transceiver be default on status at all situation. Demo circuits are illustrated in figure 3a and figure 3b.
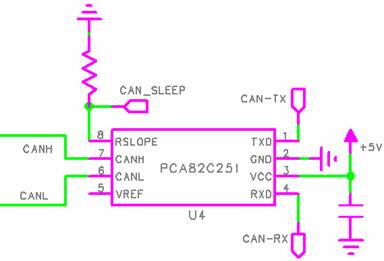
Figure 3a CAN transceiver with slop control and power-off features
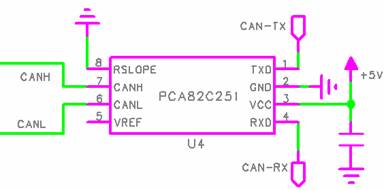
Figure 3b CAN transceiver with no slop control and power constant on
Bootloader hex code and application hex code
There are some different approaches to implement bootloader code with user application code. The following steps show one quick approach to get bootloading up and running. Following items are required to get started:
-
Application hardware
-
Au Group Electronics developed dsPIC30F bootloader hex code, or a merged hex file which contains bootloader code, application code and remapped IVT/AIVT info.
-
Application hex code with or without manual IVT/AIVT remapped info.
Note: For compact edition(s) user, the application hex code must be manually remapped to have the remapped IVT/AIVT info.
Step 1: Download bootloader code to MCU
To get bootloading started, the bootloader hex file (figure 4a) or a merged hex file (figure 4b) must be burned into microcontroller through a programmer (e.g. BB0703 (PICkit 2)/ICD2/ PM3, etc.) After a dsPIC30F MCU is burned with bootload hex file, it is cable of updating application code in field thereafter. This step is a one-time operation only.

Figure 4a

Figure 4b
On this step, using a merged file (figure 4b) which contains bootloader code, application code, and IVT/AIVT remapped info, will save user some time overall because the bootloader code and application code is programmed into the chipset in one-shot. It is extremely important for high volume manufacturing.
Step 2: Bootloading
When the MCU has the bootloader software onboard, user can download a new application hex file or a new merged hex file to microcontroller through CAN network (figure 5) at any time. An Au Group Electronics developed BLC-CAN device must be used to convert PC RS232 signal to CAN signal.

Figure 5
Note: For compact edition(s) user, the application hex code must be manually remapped to include the remapped IVT/AIVT info.
The standard edition(s) and premium edition(s) of Au Group Electronics developed dsPIC30F CAN Bootloader include the smart auto-map technology which enables user use raw application file without manually remap the IVT and AIVT. The bootloader will auto-sense and auto-remap the IVT and AIVT during bootloading process without human interference. However a manually IVT/AIVT remapped application hex file (for instance, a merged hex file which contains bootloader code, application code and remapped IVT/AIVT info) still can be used.
For the compact edition(s), because of the bootloader space limitation, they don't have the smart auto-map technology, so the re-mapping process of IVT/AIVT must be performed manually and only a hex file with remapped IVT/AIVT info can be used for bootloading.
Both IVT/AIVT manual remap service and hex file merge service are available at Au Group Electronics.
The following chapters will demonstrate on bootloading a hex file through CAN network step by step, also how to merge an application hex file with a bootloader hex file is demonstrated.
Bootloading with BLC-CAN device & PIC bootloader program
After a bootloader has been pre-programmed into a dsPIC30F chip, user application code can be upgraded any time thereafter using the BLC-CAN device and the PIC bootloader program from Au Group Electronics.
There are two methods to trigger the dsPIC30F chip entering bootloader mode: software trigger method and hardware trigger method.
Software trigger method:
This method requires integrating special CAN processing code into application software. It is an option feature for application code.
All Au Group Electronics developed bootloader support this feature for easy of use purpose. When this feature is supported, the "Reset PIC" button on "Au PIC Bootloader" software can be used to force the MCU entering bootloader mode.
Hardware trigger method:
Different hardware trigger method can be developed to force MCU entering bootloader mode at power up. For instance, on one of the Au Group Electronics CAN bootloader evaluation board, connect +12V supply to pin 7, unplug the power supply, then plug the power supply back will hardware trigger the MCU entering bootloader mode.
The following steps used software trigger to force application board entering bootloading mode, user can also try hardware trigger method at step 5.
-
Step 1: On the PC with Au PIC bootloader software installed, double click "Au PIC Bootloader V1.00B" shortcut, as shown in figure 6.

Figure 6
-
Step 2: Click "Load File" button in "Au PIC Bootloader by Au Electronics 1.00B (Eval Edition) " window, as shown in figure 7.

Figure 7
-
Step 3: Select an application hex file, e.g. "LedRotate.hex" in this case, then click "Open", as shown in figure 8.

Figure 8
-
Step 4: File name "LedRotate.hex" display, then select RS232 serial port, set speed at 11520 (figure 9).

Figure 9
-
Step 5: Click "Reset PIC" button (figure 9) will trigger the dsPIC30F CAN bootloader demo board enter bootloading mode: bootloader LED (D12, as illustrated in figure 10) on demo board blinks, Power LED (D11, as illustrated in figure 10) constant on, all the other LEDs are off. Hardware trigger method can also be used to force demo board entering bootloading mode at this step.
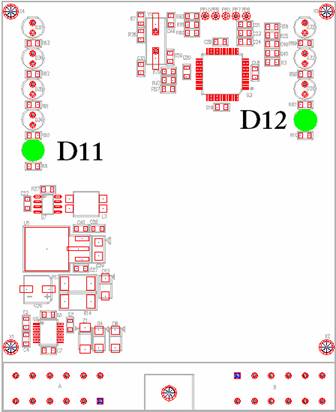
Figure 10
-
Step 6: Within 10 seconds, click "Connect" button, as shown in figure 9.
-
Step 7: The connection status ON indicator on PIC bootloader program will turn Green. Also the Bootloader LED (D12) on the demo board will be constant ON, click "Program" button ( figure 11)
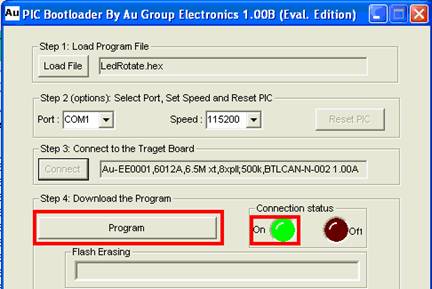
Figure 11
-
Step 8: Flash Erasing and Programming progress bar will be moving as bootloading proceed, a long beeping on PC indicates bootloading accomplished, click "Exit" to close the program, as shown in figure 12.

Figure 12
Merge application hex file with bootloader hex file and remap interrupt vectors
Even though for standard editions and premium editions, raw application hex file can be used, it is always convenient for manufacturing to have just one hex image which contains application hex code, bootloader hex code and have the IVT/AIVT remapped. The following paragraph will show one method on how to merge the application hex file with bootloader hex file step by step.
Merge application hex file with bootloader hex file
The merging process is accomplished by using Microchip® MPLAB IDE.
-
Double click shortcut of "MPLAB IDE" to open MPLAB, as shown in figure 13

Figure 13
-
Click Configure/Select Device…to open select device window, as shown in figure 14.

Figure 14
-
In "Select Device" window, select the chip from the Device drop down list, dsPIC30F6012A is showing here for example, then click OK button (figure 15).

Figure 15
-
Click Debugger/Clear Memory/All Memory to clear all memory in microcontroller, as shown in figure 16.

Figure 16
-
Click Configure/Setting…, as shown in figure 17.

Figure 17
-
Click "Program Loading" tab, make sure "Clear memory before building a project" is selected, and "Clear program memory upon loading a program" is unchecked, click "Apply", then "OK", as shown in figure 18.
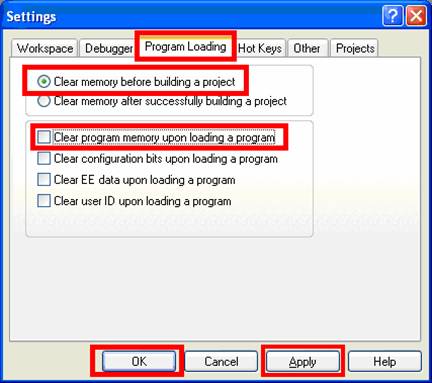
Figure 18
-
Click "View/Program memory" (figure 19) to open up "Program Memory" window.

Figure 19
-
In the Program Memory window, click "PSV Mixed" or "Machine" or "Symbolic" tab, the "Opcode" should be "FFFFFF" in all Address, as shown in figure 20.

Figure 20
-
Click File/Import… (Figure 21) to import application file.

Figure 21
-
Select your application hex file (myproject.hex file is showing here), then click "Open", as shown in figure 22

Figure 22
-
Check the Opcode from address 00004 to 0007E (address for IVT), and address from 00084 to 000FE (address for AIVT), write down all Opcode contents which are the interrupt vector address for each interrupt. They will be the address to be remapped after importing the bootloader hex file.
In the following example, most of the Opcode contents from address 00004 to 0007E are 000000, except for the Opcode at address 0001A is 001042, as shown in figure 23

Figure 23
All the Opcode contents from address 00084 to 000FE are 000000, except for the Opcode at address 0009A is 001042, as shown in figure 24

Figure 24
-
Click File/Import… (Figure 25) to import Bootloader hex file.

Figure 25
-
Select a Bootloader hex file, then click "Open", as shown in figure 26. Au Group Electronics developed hex file "dsPIC30F6012A_CAN_Bootloader_6_5MHz_with_Encription.hex" is showing here for an example.

Figure 26
-
Notice that the Opcode content for address 0001A is 000E2C after importing Bootloader file (figure 27).

Figure 27
Manually Remap Interrupt vectors
Following steps use 0001A as an example to demonstrate how to manually remap the interrupt vectors to a new location.
-
In line 14, right click 000E2C of address 0001A to open a drop down menu, then click "Go To…" to open a "Go To" window, as shown in figure 28.

Figure 28
-
In "Go To" window, enter the Opcode hex address at address 0001A: 0X000E2C, then click "Go To" button, as shown in figure 29a, curser go to line 1815 address 00E2C, as sown in figure 29b.

Figure 29a

Figure 29b
-
Double click nopr in the line of address 00E2C, change nopr to "goto 0x001042" (figure 30).

Figure 30
-
Notice the change for the line at address 00E2C and 00E2E (Figure 31):
Opcode of 00E2C change from FFFFF to 041042, disassembly showing goto 0x001042
Opcode of 00E2E change from FFFFF to 000000, disassembly showing nop

Figure 31
The above steps showed how to remap Time1 interrupt vector (0x0001A) step by step, for other interrupts, please repeat above steps 1-3.
Hex file merge service is available at Au Group Electronics.
Microchip C30 application software development
Integrate Bootloader software trigger method into application C source code
Software trigger method is always supported by all Au group Electronics developed bootloader products for easy of use purpose. However this feature requires user integrating the following function into application software.
Note: This is an option feature; user doesn't have to integrate it into its application software when resource is limited.
-
Setup the CAN module in MCU with correct speed and filters
-
Monitoring incoming CAN data and save all CAN2.0A data from ID 0x0FD (which should have been reserved for the Au Group Electronics BLC-CAN device on a CAN network)
-
When a AT command string is found as: “AT BTLD RST \r\n”, execute the following two command in sequence:
- Write "0XA55A" to EEPROM address "0X007FFFFE",
- Issue a "Reset" instruction
After the MCU issued a reset instruction, the bootloader should be able to take over and force the chip entering bootloader mode for 10 seconds. This is a one-time only operation.
Configuration bit setting in application software C source code
User can set up configuration bits in C source code, the following code gives a working example.
#include <p30fxxxx.h>
_FOSC(CSW_FSCM_OFF & XT_PLL16);
_FWDT(WDT_OFF & WDTPSA_512 & WDTPSB_1);
_FBORPOR(PBOR_ON & BORV_45 & PWRT_64 & MCLR_EN);
_FBS(NO_BOOT_RAM & NO_BOOT_EEPROM & STRD_MEDIUM_BOOT_CODE & WR_PROT_BOOT_OFF);
_FSS(NO_SEC_RAM & NO_SEC_EEPROM & NO_SEC_CODE);
_FGS(CODE_PROT_ON);
_FICD(ICS_NONE );
User may modify above code accordingly to meet specific purpose.
Watchdog usage in application software C source code
To use minimum resource/overhead and flash memory for the bootloader program, the watchdog in dsPIC30F chips is require to be controlled by the SWDTEN bit in application software, the following example demonstrate one method to use watchdog in a application software.
-
Click View/Project in MPLAB to open project window, as shown in figure 32

Figure 32
-
Double click *. C file under source files (myfile.c is showing here for example, figure 33).

Figure 33
-
Set up the watchdog configuration bits in your .C file:
#include <p30fxxxx.h>
……
_FWDT(WDT_OFF & WDTPSA_512 & WDTPSB_1);
……
-
In the initialize code, enable watchdog:
void initialize(void) {
……
_SWDTEN = 1; //enable the wdt
…… }
-
Clear watchdog in the main loop:
int main (void){
initialize(); //initialize port and variables.
while (1) {
….
ClrWdt();
….
}
return 0;
}
Application software Linker Script setting (for Microchip C30 users)
Since bootloader takes the reset vector, the starting address of the application software must be remapped in the linker script for Microchip C30 as following:
A project named myproject.mcp and a dsPIC30F6012A chipset has been used for demonstration purpose.
-
Click "View/project" to open myproject.mcw window, double click "p30f6012A.gld" under linker Script (figure 34, note: different chip will have different ***.gld file)

Figure 34
Note: the best practice is to copy this link script file to your project local folder.
-
In the p306012f.gld file, 3 places (Program ORIGIN, program LENGTH, _CODE_BASE) will be changed to 0X1000 for Premium edition(s), as shown in figure 35 and figure 36.
Note:
1. The changes are for premium edition(s) only.
2. For Standard edition(s), 0x0E00 is used. For compact edition(s), 0x0B00 is used. Au Group Electronics reserve the right to change these numbers for different application and customer requirements. It is a good practice to contact our technical support for specific chip application.

Figure 35

Figure 36
Encrypted edition(s)
Au Group Electronics provides custom designed "Hex Encoder" software program for each individual customer who purchased bootloader products with encryption feature.
Au Group Electronics "Hex Encoder" is a software program which converts non-encrypted hex file to encrypted Aud file with custom designed encryption algorithm. The encrypted Aud file can be used to upgrade microcontroller's flash memory in-field for any products with Au Group Electronics developed bootloader technology. No non-encrypted hex file will be send to the end user any more!
Note: To use encrypted Aud files, custom made bootloader application software with respect encryption/decryption algorithm is required. Please refer to Au Hex Encoder User Manual for detail information.
